NeoForge (1.21.7, 1.20.1) is a modern, open-source modding API designed to help Minecraft players and developers easily install and create mods. Built as a fork of Minecraft Forge, NeoForge was created by the majority of the original Forge team after internal disagreements, marking a fresh direction focused on transparency, performance, and developer collaboration.
While it began as a continuation of Forge during the 1.20.1 era, NeoForge became fully independent starting with Minecraft 1.20.2. It now stands as one of the primary modding platforms for the latest versions of Minecraft, gaining strong support from well-known mod developers.
Key Features:
- Open-Source and Actively Maintained
NeoForge is built by the community, for the community. Contributions are encouraged, and development is ongoing to support new Minecraft updates quickly and efficiently. - Powerful Event System for Mod Developers
Offers an extensive event-driven architecture. Modders can hook into in-game events such as:- Player interactions (e.g. right-clicking)
- Entity movement (e.g. jumping)
- Block rendering
- World loading and saving
These events make mod behavior highly customizable and modular.
- Improved Mod Compatibility and Stability
Designed to reduce conflicts between mods, NeoForge streamlines dependency handling and improves runtime performance. - Supports a Wide Range of Mods
Many popular mods now officially support NeoForge, especially those requiring advanced event control or targeting newer Minecraft versions. - User-Friendly Installer
The NeoForge installer makes it easy for players to set up modding environments without technical barriers. Once installed, NeoForge appears in the Minecraft Launcher as a new modded profile.
How to Install NeoForge:
- Download the NeoForge Installer for your Minecraft version from the official source or trusted mod websites.
- Open the installer by double-clicking the downloaded
.jarfile.
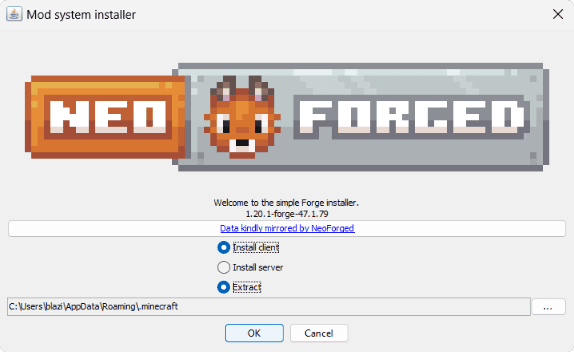
- In the installer window, select the correct Minecraft version and choose “Install client”, then click OK.
- Once the installation is complete, open the Minecraft Launcher.
- From the profile selector, choose the new NeoForge installation and click Play.
- NeoForge will now be active, and you can start adding compatible mods to your
modsfolder as usual. - Need help with installing mods? Check out our full guide on How To Download & Install Mods with Minecraft NeoForge
Why Choose NeoForge?
If you’re a mod developer looking for a modern toolkit, or a player who wants the latest mod support with fewer conflicts, NeoForge offers a future-proof solution. It’s fast, modular, and backed by a team of experienced developers committed to the Minecraft community.
Whether you’re upgrading from Forge or starting fresh, NeoForge delivers everything you need for a stable and scalable modded experience.
Download links
- Installer:download Download file
- Installer:download Download file
- Installer:download Download file
- Installer:download Download file
- Installer:download Download file
- Installer:download Download file
- Installer:download Download file
- Installer:download Download file
- Installer:download Download file
- Installer:download Download file
- Installer:download Download file
- Installer:download Download file
- Installer:download Download file
- Installer:download Download file